Creating a YAML Validation Scenario
The built-in YAML Validator engine that can be specified in a validation scenario to validate YAML documents. In this case, the validation is done against a specified JSON Schema.
Creating a YAML Validation Scenario
-
Select the
 Configure Validation Scenario(s) action in one
of the following ways:
Configure Validation Scenario(s) action in one
of the following ways:- From the
 Validation toolbar drop-down menu.
 - From the menu.
- From the Validate submenu, when invoking the contextual menu on a file in the Project view.
Step Result: The Configure Validation Scenario(s) dialog box is displayed.
- From the
-
Click the New button.
Step Result: A validation scenario configuration dialog box is displayed.
Figure 1. Validation Scenario Configuration Dialog Box 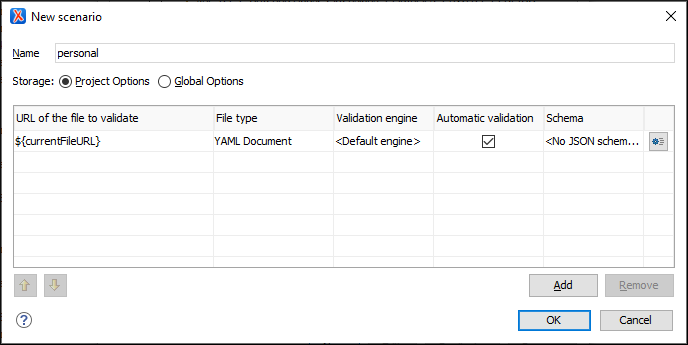 This scenario configuration dialog box allows you to configure the following information and options:
- Name
- The name of the validation scenario.
- Storage
- You can choose between storing the scenario in the Project Options or Global Options.
- URL of the file to validate
- The URL of the main module that includes the current module. It is also the
entry module of the validation process when the current one is validated. To
edit the URL, double-click its cell and
specify the URL of the main module by doing one of the following:
- Enter the URL in the text field or select it from the drop-down list.
- Use the
 Browse drop-down button to browse for a local, remote, or
archived file.
Browse drop-down button to browse for a local, remote, or
archived file. -
Use the
 Insert Editor Variable button to insert an editor variable or a custom editor
variable.
Insert Editor Variable button to insert an editor variable or a custom editor
variable.Figure 2. Insert an Editor Variable 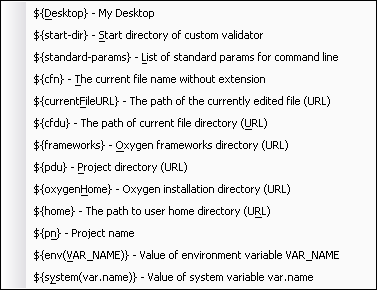
- File type
- The type of the document that is validated in the current validation unit. Oxygen XML Editor automatically selects the file type depending on the value of the URL of the file to validate field.
- Validation engine
- For YAML documents, the built-in YAML Validator engine (Default engine) is used.
- Automatic validation
- If this option is selected, the validation operation defined by this row is also applied by the automatic validation feature. If the Automatic validation feature is disabled in the Document Checking preferences page, then this option is ignored, as the preference setting has a higher priority.
- Schema
- Displays the specified schema.
 Specify Schema
- Opens the Specify Schema dialog box that allows you to set a schema to be used for validating YAML documents.
 Move
Up
Move
Up- Moves the selected scenario up one spot in the list.
 Move Down
- Moves the selected scenario down one spot in the list.
- Add
- Adds a new validation unit to the list.
- Remove
- Removes an existing validation unit from the list.
- Configure any of the existing validation units according to the information above. You can use the buttons at the bottom of the table to add, remove, or move validation units.
- Click OK.
Result: The newly created validation scenario will now be included in the list of scenarios in the Configure Validation Scenario(s) dialog box. You can select the scenario in this dialog box to associate it with the current document and click the Apply associated button to run the validation scenario.