Adding Tables in DITA Topics
 Insert Table action
on the toolbar or from the contextual menu to add a table in a DITA topic. By default, DITA
supports four types of tables:
Insert Table action
on the toolbar or from the contextual menu to add a table in a DITA topic. By default, DITA
supports four types of tables:- DITA Simple table model - This is the most commonly used model for basic tables.
- CALS table model (OASIS Exchange Table Model) - This is used for more advanced functionality.
- DITA
Choice table model - This is used within a
<step>element in a DITA Task document to describe a series of optional choices that a user must make before proceeding. - DITA Properties table model - This is used in DITA Reference documents to describe a property (for example, its type, value, and description).
Since DITA is a structured format, you can only insert a table in places in the structure of a topic where tables are allowed. The Oxygen XML Author toolbar provides support for entering and editing tables. It also helps to indicate where you are allowed to insert a table or its components by disabling the appropriate buttons.
Inserting a Simple Table Model
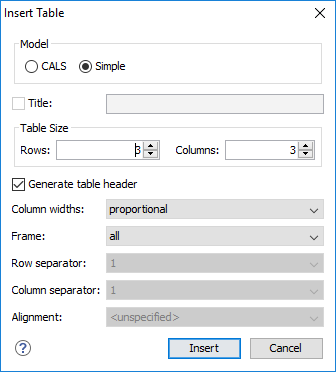
To insert a Simple DITA table, select the Insert Table action on the toolbar or from the
contextual menu (or the Table submenu from the
DITA menu). The Insert Table dialog box
appears. Select Simple for the table
Model.
- Title
- If this checkbox is selected, you can specify a title for your table in the adjacent text box.
- Generate table header
- If selected, an extra row will be inserted at the top of the table to be used as the table header.
- Column widths
- Allows you to specify the type of properties for column widths
(
@colwidthattribute). You can choose one of the following properties for the column width:- proportional - The width is specified in proportional
(relative) units of measure. The proportion of the column is specified in a
@relcolwidthattribute with the values listed as the number of shares followed by an asterisk. The value of the shares is totaled and rendered as a percent. For example,relcolwidth="1* 2* 3*"causes widths of 16.7%, 33.3%, and 66.7%. When entering content into a cell in one column, the width proportions of the other columns are maintained. If you change the width by dragging a column in Author mode, the values of the@relcolwidthattribute are automatically changed accordingly. By default, when you insert, drag and drop, or copy/paste a column, the value of the@relcolwidthattribute is1*. - dynamic - If you choose this option, the columns are created without a specified width. Entering content into a cell changes the rendered width dynamically. If you change the width by dragging a column in Author mode, a dialog box will be displayed that asks you if you want to switch to proportional or fixed column widths.
- proportional - The width is specified in proportional
(relative) units of measure. The proportion of the column is specified in a
- Frame
- Allows you to specify a value for the
@frameattribute. It is used to specify where a border should appear in the table. The allowed values are as follows:- none - No border will be added.
- all - A border will be added to all frames.
- top - A border will be added to the top frame.
- topbot - A border will be added to the top and bottom frames.
- bottom - A border will be added to the bottom frame.
- sides - A border will be added to the side frames.
- -dita-use-conref-target - Normally, when using a
@conref, the values of attributes specified locally are preserved. You can choose this option to override this behavior and pull the value of this particular attribute from the@conreftarget. For more information, see https://www.oxygenxml.com/dita/1.3/specs/langRef/attributes/ditauseconreftarget.html.
When you click Insert, a simple table is inserted into your document at the current cursor position.
Inserting a CALS Table Model (OASIS Exchange Table)
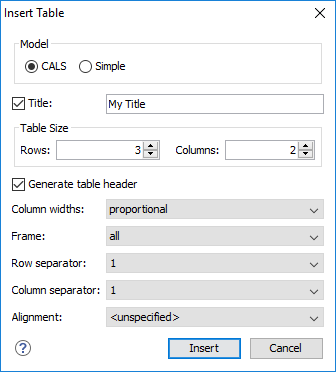
To insert an OASIS Exchange Table (CALS), select the Insert Table action on the toolbar or from the
contextual menu (or the Table submenu from the
DITA menu). The Insert Table dialog box
appears. Select CALS for the table Model. This
model allows you to configure more properties than the Simple model.
- Title
- If this checkbox is selected, you can specify a title for your table in the adjacent text box.
- Table Size
- Allows you to choose the number of Rows and Columns for the table.
- Generate table header
- If selected, an extra row will be inserted at the top of the table to be used as the table header.
- Column widths
- Allows you to specify the type of properties for column widths
(
@colwidthattribute). You can choose one of the following properties for the column width:- proportional - The width is specified in proportional
(relative) units of measure. The proportion of the column is specified in a
@colwidthattribute with the values listed as the number of shares followed by an asterisk. The value of the shares is totaled and rendered as a percent. For example,colwidth="1* 2* 3*"causes widths of 16.7%, 33.3%, and 66.7%. When entering content into a cell in one column, the width proportions of the other columns are maintained. If you change the width by dragging a column in Author mode, the values of the@colwidthattribute are automatically changed accordingly. By default, when you insert, drag and drop, or copy/paste a column, the value of the@colwidthattribute is1*. - dynamic - If you choose this option, the columns are
created without a specified width (
@colwidthattribute). Entering content into a cell changes the rendered width dynamically. If you change the width by dragging a column in Author mode, a dialog box will be displayed that asks you if you want to switch to proportional or fixed column widths. - fixed - The width is specified in fixed units. By default,
the
ptunit is inserted, but you can change the units in the colspecs (column specifications) section above the table or in Text mode. The following units are allowed:pt(points),cm(centimeters),mm(millimeters),pi(picas),in(inches).
- proportional - The width is specified in proportional
(relative) units of measure. The proportion of the column is specified in a
- Frame
- Allows you to specify a value for the
@frameattribute. It is used to specify where a border should appear in the table. The allowed values are as follows:- none - No border will be added.
- all - A border will be added to all frames.
- top - A border will be added to the top frame.
- topbot - A border will be added to the top and bottom frames.
- bottom - A border will be added to the bottom frame.
- sides - A border will be added to the side frames.
- -dita-use-conref-target - Normally, when using a
@conref, the values of attributes specified locally are preserved. You can choose this option to override this behavior and pull the value of this particular attribute from the@conreftarget. For more information, see https://www.oxygenxml.com/dita/1.3/specs/langRef/attributes/ditauseconreftarget.html.
- Row separator
- Specifies whether or not to include row separators (
@rowsepattribute). The allowed values are:0(no separator) and1(include separators). - Column separator
- Specifies whether or not to include column separators (
@colsepattribute). The allowed values are:0(no separator) and1(include separators). - Alignment
- Specifies the alignment of the text within the table (
@alignattribute). The allowed values are:- left - Aligns the text to a left position.
- right - Aligns the text to a right position.
- center - Aligns the text to a centered position.
- justify - Stretches the line of text so that it has equal
width.Note: The
justifyvalue cannot be rendered in Author mode, so you will only see it in the output. - char - Aligns text to the leftmost occurrence of the value
specified on the
@charattribute for alignment. - -dita-use-conref-target - Normally, when using a
@conref, the values of attributes specified locally are preserved. You can choose this option to override this behavior and pull the value of this particular attribute from the@conreftarget. For more information, see https://www.oxygenxml.com/dita/1.3/specs/langRef/attributes/ditauseconreftarget.html.
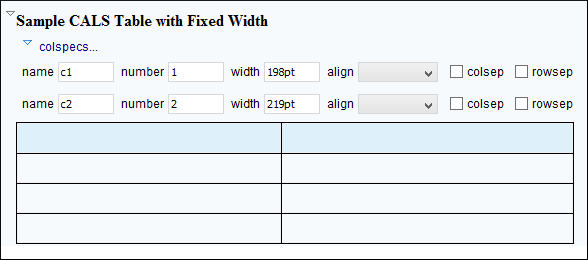
When you click Insert, a CALS table is inserted into your document at the current cursor position.
When you insert a CALS table, you see a link for setting the colspecs (column specifications) of your table. Click the link to open the controls that allow you to adjust various column properties. Although they appear as part of the Author mode, the colspecs link and its controls will not appear in your output. They are just there to make it easier to adjust how the columns of your table are formatted.
Inserting a Choice Table Model
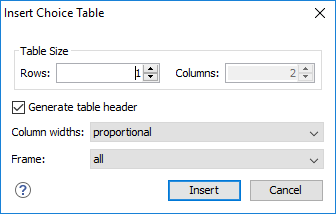
To insert a Choice table within a <step> element in a DITA Task
document, select the Insert Table
action on the toolbar or in the Insert submenu from the contextual
menu (or the Table submenu from the DITA
menu), or select choicetable from the Content Completion
Assistant. The Insert Table dialog box appears.
Select Simple for the table Model.
- Table Size
- Allows you to choose the number of Rows and Columns for the table.
- Generate table header
- If selected, an extra row will be inserted at the top of the table to be used as the table header.
- Column widths
- Allows you to specify the type of properties for column widths
(
@colwidthattribute). You can choose one of the following properties for the column width:- proportional - The width is specified in proportional
(relative) units of measure. The proportion of the column is specified in a
@relcolwidthattribute with the values listed as the number of shares followed by an asterisk. The value of the shares is totaled and rendered as a percent. For example,relcolwidth="1* 2* 3*"causes widths of 16.7%, 33.3%, and 66.7%. When entering content into a cell in one column, the width proportions of the other columns are maintained. If you change the width by dragging a column in Author mode, the values of the@relcolwidthattribute are automatically changed accordingly. By default, when you insert, drag and drop, or copy/paste a column, the value of the@relcolwidthattribute is1*. - dynamic - If you choose this option, the columns are created without a specified width. Entering content into a cell changes the rendered width dynamically. If you change the width by dragging a column in Author mode, a dialog box will be displayed that asks you if you want to switch to proportional or fixed column widths.
- proportional - The width is specified in proportional
(relative) units of measure. The proportion of the column is specified in a
- Frame
- Allows you to specify a value for the
@frameattribute. It is used to specify where a border should appear in the table. The allowed values are as follows:- none - No border will be added.
- all - A border will be added to all frames.
- top - A border will be added to the top frame.
- topbot - A border will be added to the top and bottom frames.
- bottom - A border will be added to the bottom frame.
- sides - A border will be added to the side frames.
- -dita-use-conref-target - Normally, when using a
@conref, the values of attributes specified locally are preserved. You can choose this option to override this behavior and pull the value of this particular attribute from the@conreftarget. For more information, see https://www.oxygenxml.com/dita/1.3/specs/langRef/attributes/ditauseconreftarget.html.
When you click Insert, a Choice table is inserted into your
DITA Task document at the current cursor position (within a <step>
element).
Inserting a Properties Table Model
To insert a Properties table within a <refbody> element in a DITA
Reference document, select the Insert
Table action on the toolbar or in the Insert submenu
from the contextual menu (or the Table submenu from the
DITA menu), or select properties(wizard) from the Content Completion
Assistant. The Insert Table dialog box appears.
Select Properties for the table Model.
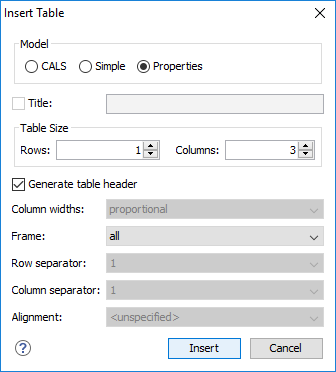
- Table Size
- Allows you to choose the number of Rows and Columns for the table.
- Generate table header
- If selected, an extra row will be inserted at the top of the table to be used as the table header.
- Frame
- Allows you to specify a value for the
@frameattribute. It is used to specify where a border should appear in the table. The allowed values are as follows:- none - No border will be added.
- all - A border will be added to all frames.
- top - A border will be added to the top frame.
- topbot - A border will be added to the top and bottom frames.
- bottom - A border will be added to the bottom frame.
- sides - A border will be added to the side frames.
- -dita-use-conref-target - Normally, when using a
@conref, the values of attributes specified locally are preserved. You can choose this option to override this behavior and pull the value of this particular attribute from the@conreftarget. For more information, see https://www.oxygenxml.com/dita/1.3/specs/langRef/attributes/ditauseconreftarget.html.
When you click Insert, a Properties table is inserted into
your DITA Reference document at the current cursor position (within a
<refbody> element).
Editing an Existing Table
You can edit the structure of an existing table using the table buttons on the toolbar (or in the contextual menu) to add or remove cells, rows, or columns, and to set basic table properties. Additional attributes can be used to fine-tune the formatting of your tables by using the Attributes view (). See the DITA documentation for a full explanation of these attributes.
You can also use the  Table Properties (Ctrl + T (Command + T on
macOS))
action from the toolbar or contextual menu (or DITA menu) to modify many of the properties of
the table.
Table Properties (Ctrl + T (Command + T on
macOS))
action from the toolbar or contextual menu (or DITA menu) to modify many of the properties of
the table.
Also, remember that underneath the visual representation, both table models are really just XML. If necessary, you can edit the XML directly by switching to Text mode.
You can use normal copy/paste shortcuts to move content between cells. Oxygen XML Author includes a Smart Paste feature that preserves certain style and structure information when pasting content.