Adding Tables in XHTML Documents
You can use the  Insert Table action
on the toolbar or from the contextual menu to add a table in an XHTML document. This action
opens the Insert Table dialog box.
Insert Table action
on the toolbar or from the contextual menu to add a table in an XHTML document. This action
opens the Insert Table dialog box.
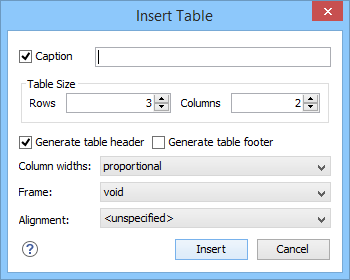
- Caption
- If this checkbox is selected, you can specify a title (caption) for your table in the adjacent text box.
- Table Size
- Allows you to choose the number of Rows and Columns for the table.
- Generate table header
- If selected, an extra row will be inserted at the top of the table to be used as the table header.
- Generate table footer
- If selected, an extra row will be inserted at the bottom of the table to be used as the table footer.
- Column widths
- Allows you to specify the type of properties for column widths (
@widthattribute). You can choose one of the following properties for the column width:- proportional - The width is specified in proportional
(relative) units of measure. The proportion of the column is specified in a
@widthattribute (in a<col>element) with the values listed as the number of shares followed by an asterisk. The value of the shares is totaled and rendered as a percent. For example,width="1* 2* 3*"causes widths of 16.7%, 33.3%, and 66.7%. When entering content into a cell in one column, the width proportions of the other columns are maintained. If you change the width by dragging a column in Author mode, the values of the@widthattribute are automatically changed accordingly. By default, when you insert, drag and drop, or copy/paste a column, the value of the@widthattribute is1*. - dynamic - If you choose this option, the columns are created without a specified width. Entering content into a cell changes the rendered width dynamically. If you change the width by dragging a column in Author mode, a dialog box will be displayed that asks you if you want to switch to proportional or fixed column widths.
- fixed - The width is specified in fixed units. By default,
the
ptunit is inserted, but you can change the units in the section above the table or in Text mode. In addition to the standard pixel, percentage, and relative values, this attribute also allows the special form “0*” (zero asterisk), which means that the width of each column in the group should be the minimum width necessary to hold the contents.
- proportional - The width is specified in proportional
(relative) units of measure. The proportion of the column is specified in a
- Frame
- Allows you to specify a value for the
@frameattribute. It is used to specify where a border should appear in the table. There are a variety of allowed values, as specified in HTML specifications. - Alignment
- Specifies the alignment of the text within the table (
@alignattribute). The allowed values are:- left - Aligns the text to a left position.
- right - Aligns the text to a right position.
- center - Aligns the text to a centered position.
- justify - Stretches the line of text so that it has equal width. Note that this value cannot be rendered in Author mode, so you will only see it in the output.
- char - Aligns text to the leftmost occurrence of the value
specified on the
@charattribute for alignment.
When you click Insert, an HTML style of table is inserted into your XHTML document at the current cursor position.
When you insert an HTML table, you see a link for setting the <colspecs>
(column specifications) of your table. Click the link to open the controls that allow you to
adjust various column properties. Although they appear as part of the Author mode, the
colspecs link and its controls will not appear in your output. They are
just there to make it easier to adjust how the columns of your table are formatted.
Editing an Existing Table
You can edit the structure of an existing table using the table buttons on the toolbar (or in the contextual menu) to add or remove cells, rows, or columns, and to set basic table properties. Additional attributes can be used to fine-tune the formatting of your tables by using the Attributes view (). Also, remember that underneath the visual representation, the table is really just XML. If necessary, you can edit the XML directly by switching to Text mode.