How to Compare and Merge Documents with Change Tracking Highlights
Oxygen XML Editor includes two actions (Merge Documents with Change Tracking Highlights and a Merge Directories with Change Tracking Highlights) within the menu that can be used to compare and merge content and the comparison results are saved as documents with highlighted tracked changes that can be later reviewed and accepted or rejected.
This topic provides instructions and several different use cases for how to get the most out of comparing and merging documents with change tracking highlights present.
Use Case 1: Review Changes Made to an XML Document
The Merge Documents with Change Tracking Highlights tool can be used to merge two XML documents, based on a 2-way mode comparison. The files involved in the process are merged by saving the comparison results as documents with highlighted tracked changes.
- Select the Merge Documents with Change Tracking Highlights action that is found in the menu to invoke the tool. It opens a dialog box where you can specify the documents to merge.
- In the resulting dialog box, you need to provide the URLs of the base version of the
document (Base document) and the modified version
(Document to merge with), and then click the
Merge button.
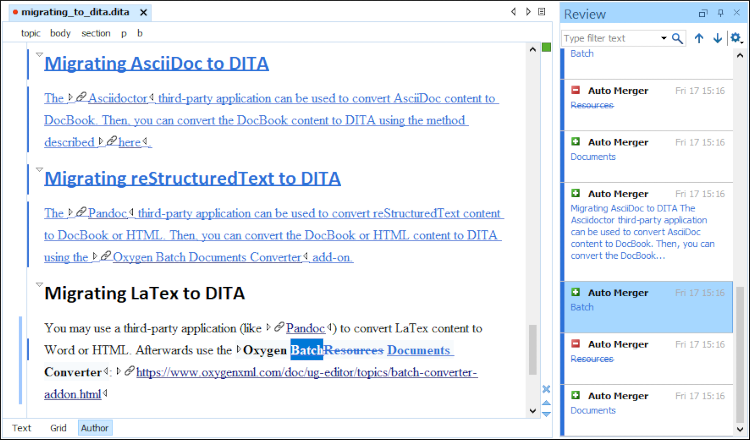
Step Result: The resulting document is automatically loaded into a new editor tab. It incorporates special markings for the tracked changes/differences between the 2 compared and analyzed XML files.
- Switch to the Author mode and then open the
Review view (click the
 Manage reviews button on the toolbar
or select it from the menu).
Manage reviews button on the toolbar
or select it from the menu).Step Result: All detected changes are listed in the Review view and they are marked accordingly in the resulting document as well.
- You can analyze each detected change one by one and accept or reject them individually or in bulk.
- Save the changes you made during the reviewing process.
Use Case 2: Compare Differences Between Two Versions
Another interesting way of using the resulting merged document that incorporates the change tracking marks between 2 versions is to apply a transformation of the resulting document into a PDF file that highlights the changes between the compared versions.
- Select the Merge Documents with Change Tracking Highlights action that is found in the menu to invoke the tool. It opens a dialog box where you can specify the documents to merge.
- In the resulting dialog box, you need to provide the URLs of the base version of the document (Base document) and the modified version (Document to merge with), and then click the Merge button.
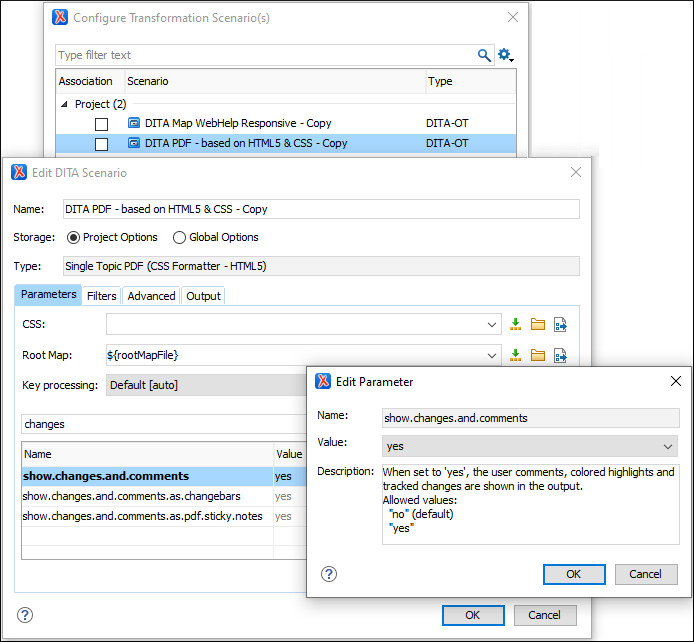
- With the resulting merged document open in the editor, click the Configure Transformation Scenario(s) button from the toolbar.
- Select the default read-only scenario DITA PDF - based on HTML5 & CSS and click the Duplicate button to create a copy so that you can make a few changes to the default settings.
- In the resulting Edit DITA Scenario dialog box, go to the
Parameters tab and type "changes" in text filter field above
the table of parameters. This will display the three parameters that are responsible for
displaying the tracked changes in the resulting PDF and they must all be set to the
value of yes:
show.changes.and.commentsshow.changes.and.comments.as.changebarsshow.changes.and.comments.as.pdf.sticky.notes
- Click OK, and with the newly created copy of the scenario
selected, click the Apply associated button to run the
transformation.
Result: Once the transformation is finished, the resulting PDF is automatically opened in the system's default PDF reader (e.g. Adobe). If you hover the mouse over the presented colored markers, you will notice that the tooltip shows that some are of the type "inserted", while others are of the type "deleted". Text areas and fragments with changes are also marked with gray "change" bars on the left. The changed content is placed between curly brackets and is colored blue or red depending on the type of change (insertion or deletion).

Use Case 3: Compare and Merge Entire Directories
Another use case is to use the Merge Directories with Change Tracking Highlights action to merge entire directories instead of specified pairs of XML files.
- Select the Merge Directories with Change Tracking Highlights action that is found in the menu to invoke the tool. It opens a dialog box where you can specify the documents to merge.
- In the resulting dialog box, you need to provide the URLs of the Base directory, the Directory to merge with, and the Output directory.
- You can optionally select the Backup the base directory option.
Not that this option is automatically activated and selected in the following cases:
- The output directory is not specified (the field is left blank).
- The specified output directory is the base directory itself.
In these situations, a backup of the base directory will be performed automatically and the backup operation must succeed to proceed with the merge. Otherwise, the merge process is aborted.
- You can adjust the settings in the Merge options section. You
can find details for each option in Merge Directories with Change Tracking Highlights: Merge Options. Note that
all of these options are enabled by default except for Create change tracking
markers for the XML files to be added.
To better understand the merge options presented in this section, note that the merge process has a preliminary phase where the entire structure and the content of the base directory is copied to the output directory.
Since this example is for reviewing the changes between two versions of an entire DITA project, you would select all options in the Merge options section, including the Create change tracking markers for XML files to be added option.
- Click the he Merge button to start the process of generating
the results of the merge operation. Depending on the number of files in the compared
directories and the total number of changes detected, the process may take some
time.
Step Result: The operation report should automatically open in Author mode. The listed URLs are actually links that will open the corresponding merged DITA file in the editor. You can inspect the changes and accept or reject them, individually or in bulk.
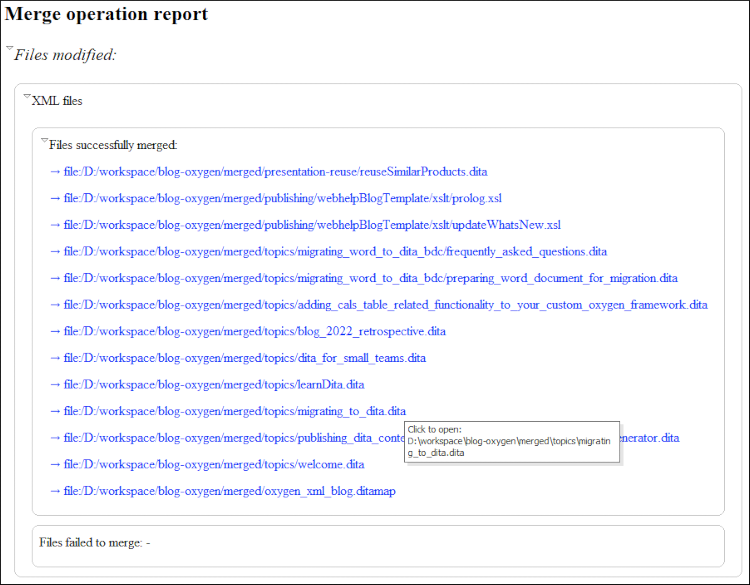
The first group of URLs listed represents the group of XML files detected as modified and merged with change tracking highlights.
The modified non-XML file group follows. Since the Update the modified non-XML files option was selected, these type of non-XML files from the Base directory were replaced by their corresponding files in the Directory to merge with.
Next are the XML files that were initially present only in the Directory to merge with. They were also added to the Output directory, since the Add the files found only in the directory to merge with option was selected.
Since the Create change tracking markers for the XML files to be added was also selected, change tracking markers of type "entire content added/inserted" were created. Note that it does not make sense to reject that type of change. The Create change tracking markers for the XML files to be added option is not intended for the merge process itself, but it is useful if you want to apply various Oxygen transformation scenarios to the resulting output directory, as explained later.
Next comes the group of non-XML files initially present only in the Directory to merge with and they were also copied to the output directory. Basically, these are resources (usually image or video files) used by the file group listed above. Clicking these types of file links results in opening them in the appropriate application installed on your computer.
The last group listed in the report represents the group of files from the "base directory" that have no longer counterparts in the "directory to merge with". Since the Delete the files found only in the base directory option was selected, these files are eventually deleted, even if they were initially copied to the output directory. The links also work for them, opening the associated files from the Base directory.
- Now that you have the directory resulting from the merge operation at your disposal,
you can apply a transformation scenario to obtain a PDF document that highlights the
changes between the 2 versions. Open the DITA map that resulted from the merge operation
in the DITA Maps Manager, click the Configure
Transformation Scenario(s) button in the toolbar of the view, and apply
the DITA Map PDF - based on HTML5 & CSS - Copy transformation
scenario using the same configuration as explained in Use Case 2: Compare Differences Between Two Versions.
Step Result: Once the transformation is finished, the resulting PDF is automatically opened in the system's default PDF reader (e.g. Adobe).
- In Adobe, there is a side view identified as Bookmarks (on the right or left side, depending of the Adobe version). By selecting Contents in this view and then scrolling down, you can hover the mouse over the presented colored markers for the new topics and you will notice that tooltip shows that they are "inserted". You can click on any of these new topics to scroll to the respective topic and you will notice that it is marked with blue in the document (the color used for newly added content). If you continue to scroll down the PDF, you will notice various "insert" and "delete" changes.
- Click the Review comments button on the side stripe of the
Bookmarks view:
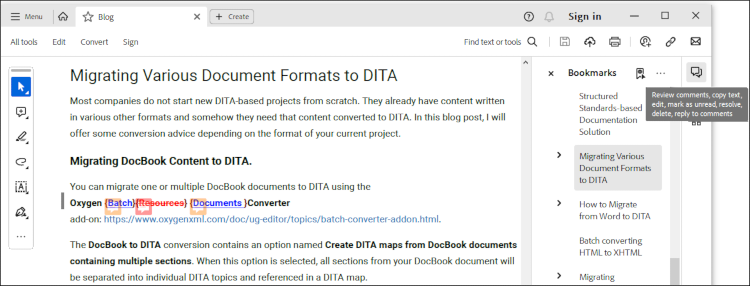
Step Result: A list appears that contains all highlighted changes in the PDF.
- You can scroll through the list and click on the changes listed to conveniently analyze and review all tracked and highlighted changes between the 2 versions of the DITA project.
WebHelp Responsive Alternative
- Select the default read-only scenario DITA Map WebHelp Responsive and click the Duplicate button to create a copy so that you can make a few changes to the default settings.
- In the resulting Edit DITA Scenario dialog box, go to the
Parameters tab and type "changes" in text filter field above
the table of parameters. Make sure the
webhelp.show.changes.and.commentsparameter is set to yes.
- Click OK, and with the newly created copy of the scenario
selected, click the Apply associated button to run the
transformation.
Step Result: Once the transformation finishes, the resulting WebHelp output is opened in your default Internet browser. By clicking on any of the chapters listed, you can browse the respective content and observe how the changes are rendered. The color code is the same (blue for the changes of the type "added" or "inserted", and red for those of the type "deleted"). The yellow markings on the right side also help to navigate through and analyze/review the highlighted changes.
Resources
For more information about how to merge documents/directories with change tracking highlights, watch our video demonstration: