Linking in DITA Topics
Direct Links
Inline links can be created DITA topics using the <xref> element. The
destination of the link can be expressed directly by using the @href
attribute and the target can be another topic or a specific element within the other topic,
another location within the same topic, a file, or a web link. You can also create direct
related links to topics, files, or websites in a DITA topic using the
<related-links> element.
Indirect Links Using Keys
The destination of the link can also be expressed indirectly by using keys to create either inline links or related
links (with the @keyref attribute). By using keys, you avoid creating
a direct dependency between topics. This makes links easier to manage and can make it easier
to reuse topics in various publications. It can also be helpful in verifying the
completeness of a publication, by ensuring that a publication map provides a key definition
for every key reference used in the content.
- Key Definition - Assigns a key to a topic so that other topics can link to it. For more information, see Defining Keys in DITA Maps.
- Key Reference - Created in an
<xref>element and specifies the key to link to.
<topicref> element
that points to a topic. This allows you to assign a particular key to one topic in one map
and to another topic in another map. When a topic that links to that key is used in each of
these maps, the links work correctly in both maps.Inserting a Link in Oxygen XML Editor
To insert a link in Author mode, use the actions available in the
 Link
drop-down menu from the toolbar (or the
Link
drop-down menu from the toolbar (or the  Link submenu in the contextual menu or DITA menu).
You can choose between the following types of inline links:
Link submenu in the contextual menu or DITA menu).
You can choose between the following types of inline links:
- Cross Reference
- Opens the Cross Reference (xref) dialog box that
allows you to insert a cross reference link to a target DITA resource at the current
location within a document. The target resource can be the location of a file or a key
that is already defined in your DITA map structure. Once the target resource has been
selected, you can also target specific elements within that resource. Depending on the
context where it is invoked, the action inserts one of the following two elements:
<xref>- Used to link to other topics or another location within the same topic and points to the target using the@hrefor@keyrefattribute.<fragref>- A logical reference to a fragment element within a syntax diagram and points to the target using the@hrefor@keyrefattribute.
- File Reference
- Opens a dialog box that allows you to insert a link to a target non-DITA file
resource at the current location within a document. The target resource can be the
location of a file or a key that is already defined in your DITA map
structure. It inserts an
<xref>element with either an@hrefattribute or a@keyrefattribute. If you select Location for the target, the link is expressed in an@hrefattribute. If you select Key for the target, keys will be used to express the link in a@keyrefattribute. You can select a key from the drop-down list or click the Choose Key Reference
button to use the Choose
Key dialog box.
Choose Key Reference
button to use the Choose
Key dialog box. - Web Link
- Opens a dialog box that allows you to insert a link to a target web-related resource
at the current location within a document. The target resource can be a URL or a key
that is already defined in your DITA map structure. It inserts an
<xref>element with either an@hrefattribute or a@keyrefattribute. If you select URL for the target resource, the link is expressed in an@hrefattribute. If you select Key for the target, keys will be used to express the link in a@keyrefattribute. You can select a key from the drop-down list or click theChoose Key Reference button to use the Choose Key dialog
box. - Opens the Cross Reference (xref) dialog box that
allows you to insert a link to a target DITA resource in a related links section that
is typically at the bottom of your topic (although this depends on the behavior of the
output transformation). The target resource can be the location of a file or a key
that is already defined in your DITA map structure. Once the target
resource has been selected, you can also target specific elements within that
resource. If a related links section does not already exist, this action creates one.
Specifically, it inserts a
<link>element inside a related-links element.Tip: You can use the Find Similar Topics action (available in the contextual menu or DITA menu) to quickly find related topics that can be added as related links. It opens the Open/Find Resource view and performs a search using text content from the<title>,<shortdesc>,<keyword>, and<indexterm>elements. - Opens a dialog box that allows you to insert a link to a target non-DITA file
resource in a related links section that is typically at the bottom of your topic
(although this depends on the behavior of the output transformation). The target
resource can be the location of a file or a key that is already defined in your
DITA map structure. If a related links section does not already exist,
this action creates one. Specifically, it inserts a
<link>element inside a related-links element. If you select Location for the target, the link is expressed in an@hrefattribute. If you select Key for the target, keys will be used to express the link in a@keyrefattribute. You can select a key from the drop-down list or click theChoose Key Reference
button to use the Choose
Key dialog box. - Opens the Web Link dialog box that allows you to insert a
link to a target web-related resource in a related links section that is typically at
the bottom of your topic (although this depends on the behavior of the output
transformation). The target resource can be a URL or a key that is already defined in
your DITA map structure. If a related links section does not already
exist, this action creates one. Specifically, it inserts a
<link>element inside a related-links element. If you select URL for the target resource, the link is expressed in an@hrefattribute. If you select Key for the target, keys will be used to express the link in a@keyrefattribute. You can select a key from the drop-down list or click theChoose Key Reference
button to use the Choose
Key dialog box.
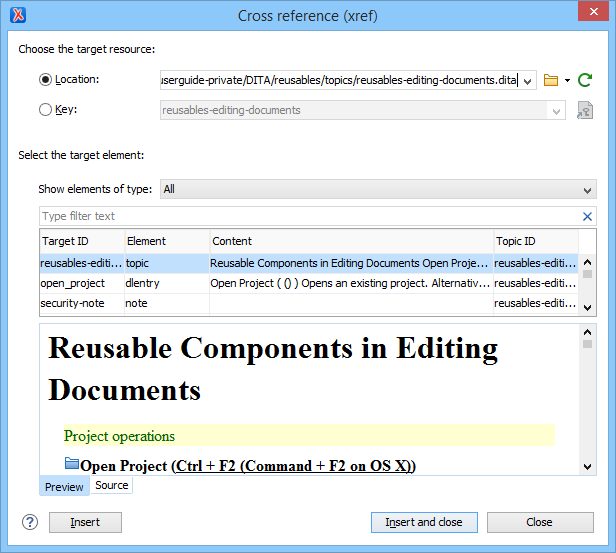
Cross Reference (xref) Dialog Box
The Cross Reference (xref) dialog box is displayed when you insert a
Cross Reference or Related Link to Topic
(from the Link drop-down menu).
It allows you to insert a link to a target resource at the current location within a
document (for a Cross Reference link) or in a related links section
(for a Related Link to Topic). The target resource can be the
location of a file or a key that is already defined in your DITA map structure.
Once the target resource has been selected, you can also target specific elements within
that resource.
- Choose the Target Resource Section
-
- Location
- If you select Location for the target, the link is
expressed in an
@hrefattribute. - Key
-
If you select Key for the target, keys will be used to express the link in a
@keyrefattribute. You can use the Choose Key Reference button to open
the Choose Key dialog box that allows you to select one
from a list of all the keys that are gathered from the root map (you can also
select one from the drop-down list in the Key
field).Tip: You can also use the DITA Reusable Components view for similar purposes.
Choose Key Reference button to open
the Choose Key dialog box that allows you to select one
from a list of all the keys that are gathered from the root map (you can also
select one from the drop-down list in the Key
field).Tip: You can also use the DITA Reusable Components view for similar purposes.Figure 2. Choose Key Dialog Box 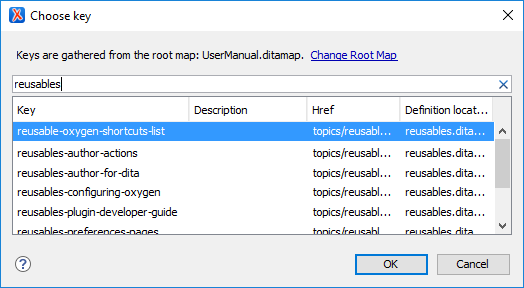 The Choose Key dialog box includes the following:
- Change Root Map - Opens a small dialog box that allows you to select a root map.
- Search Filter - You can enter text in the filter field at the top of the dialog box to filter the list and search for specific keys.
- Sortable Columns - The dialog box includes the following columns
that can be sorted by clicking on the heading:
- Key - The name of the key (the value of the
@keysattribute). - Description - The description of the key that
is obtained from its definition. Keys that are defined with a text
value in the
<navtitle>or<keyword>element have that value listed in this column. - Href - Keys that are defined with a value in
an
@hrefattribute have that href value listed in this column. - Definition Location - The name of the DITA map where the key is defined.
- Key - The name of the key (the value of the
- Group by Definition Location - A contextual menu action that can be used to group (and sort) all the keys based upon the value in the Definition Location column.
- Select the Target Element Section
-
This section can be used to target a specific element inside the target resource.
- Show elements of type
- You can use this drop-down list to select specific types of elements to be displayed in the subsequent table. This can help you narrow down the list of possible source elements that you can select.
- Text Filter Field
- You can also use the text filter field to narrow down the list of possible source elements to be displayed in the subsequent table.
- Element Table
- Presents all the element IDs defined in the source topic. Use this table to select the Target ID of the element that you want to reference.
- Preview Pane
- Displays the content that will be references.
- Source Pane
- Displays the XML source code of the element to be referenced.
Using Copy/Paste or Drag/Drop Actions to Insert a Cross Reference
Oxygen XML Editor also includes support for inserting cross reference links with
simple copy/paste or drag/drop actions (additionally, you can insert them using the
Paste as Link or Paste as Link (keyref)
actions found in the  Paste Special submenu from the contextual menu). The
copied/dragged content must be an entire DITA XML element with an
Paste Special submenu from the contextual menu). The
copied/dragged content must be an entire DITA XML element with an @id
attribute or a <topicref>. Also, the location in the document where
you paste or drop the link must be valid, although as long as the Smart paste and drag and drop option is selected in the
Schema-Aware preferences page, if you try to paste it in an invalid
location, Oxygen XML Editor will attempt to place it in a valid location, and may
prompt you with one or more choices for where to place it.
When the link is inserted, Oxygen XML Editor automatically tries to populate certain
attributes based on detected values. The @format, @scope,
and @type attributes are populated if their corresponding options are
selected in the Inserting Links section of the DITA Topics preferences
page. Even if their corresponding options are not selected, the
@format and @scope attributes are populated if their
detected values are different than the default values.
@type attribute is never automatically
computed in the following cases:- When using drag/drop or copy/paste actions from the DITA Maps Manager view or from the Keys tab of the DITA Reusable Components view.
- When using the Paste as Link or Paste as Link
(keyref) actions to paste a topic reference that was copied from the DITA Maps
Manager view and its
<topicref>elements do not have the@typeattribute defined.
@href attribute, but
it is also possible to insert them with a @keyref attribute using the
Paste as Link (keyref) contextual menu action or copy/paste or
drag/drop actions. For the latter method, follow these steps :- In the DITA Maps Manager view, make sure that the Context combo box points to the correct map that stores the keys.
- Make sure the topic that contains the content you want to reference has a key assigned to it. To assign a key, right-click the topic with its parent map opened in the DITA Maps Manager, select Edit Properties, and enter a value in the Keys field.
- Copy an entire DITA element that has an ID attribute assigned to it from a topic with
an assigned key, or a
<topicref>from a DITA map. - Place the cursor at a location, where you want to insert the link.
- Select the Paste as Link (keyref) action from the
Paste
Special submenu from the contextual menu.