Tables
Tables are widely used in technical documentation. This section contains information about the CSS rules that are used to style them and how to fix some problems.
Tables - Built-in CSS
- [PLUGIN_DIR]/css/core/-table-html-cals.css
- [PLUGIN_DIR]/css/print/p-tables.css
How to Avoid a Table Exceeding the Page Width
- Using proportional or relative measures - It includes percent values and shares values (i.e. "3*" or "12*").
-
Using fixed measures - It includes all the values followed by units (i.e. in, pt, px, and others).
- Although the specification allows you to combine these values, it is highly recommend that you only use one method at a time. Combining both methods could lead to a table exceeding the page width and will make the content unreadable.
- If all of the column width values are not declared in the table, the shares values (e.g. "2.5*") will not be used.
How to Handle Wide Tables - Page Rotation
Some of the tables can have a large number of columns. In this case, the table may bleed out of the page. One solution is to use landscape pages for these tables.
Setting the attribute orient = 'land' attribute on the
table element will force the table to be on a new landscape page.
Another solution is to use automatic detection of wide tables (5 or more columns):
*[class~="topic/table"][data-cols='5'],
*[class~="topic/table"][data-cols='6'],
*[class~="topic/table"][data-cols='7'],
*[class~="topic/table"][data-cols='8'],
*[class~="topic/table"][data-cols='9'],
*[class~="topic/table"][data-cols='10'] {
  page: landscape-page;
  max-width: 100%;
  max-height: 100%;
  width: 100%;
  page-break-before: avoid;
}
landscape-page page layout is defined in the
[PLUGIN_DIR]/css/print/p-pages-and-headers.css file. If you want to rotate the entire topic that contains the big table, use:
*[class~="topic/table"][data-cols='5'],
*[class~="topic/table"][data-cols='6'],
*[class~="topic/table"][data-cols='7'],
*[class~="topic/table"][data-cols='8'],
*[class~="topic/table"][data-cols='9'],
*[class~="topic/table"][data-cols='10'] {
  max-width: 100%;
  table-layout:auto;
}

*[class~="topic/topic"]:has(*[class~="topic/body"] > *[class~="topic/table"][data-cols='5']),
*[class~="topic/topic"]:has(*[class~="topic/body"] > *[class~="topic/table"][data-cols='6']),
*[class~="topic/topic"]:has(*[class~="topic/body"] > *[class~="topic/table"][data-cols='7']),
*[class~="topic/topic"]:has(*[class~="topic/body"] > *[class~="topic/table"][data-cols='8']),
*[class~="topic/topic"]:has(*[class~="topic/body"] > *[class~="topic/table"][data-cols='9']),
*[class~="topic/topic"]:has(*[class~="topic/body"] > *[class~="topic/table"][data-cols='10']),
*[class~="topic/topic"]:has(*[class~="topic/body"] > * > *[class~="topic/table"][data-cols='5']),
*[class~="topic/topic"]:has(*[class~="topic/body"] > * > *[class~="topic/table"][data-cols='6']),
*[class~="topic/topic"]:has(*[class~="topic/body"] > * > *[class~="topic/table"][data-cols='7']),
*[class~="topic/topic"]:has(*[class~="topic/body"] > * > *[class~="topic/table"][data-cols='8']),
*[class~="topic/topic"]:has(*[class~="topic/body"] > * > *[class~="topic/table"][data-cols='9']),
*[class~="topic/topic"]:has(*[class~="topic/body"] > * > *[class~="topic/table"][data-cols='10']),
*[class~="topic/topic"]:has(*[class~="topic/body"] > * > * > *[class~="topic/table"][data-cols='5']),
*[class~="topic/topic"]:has(*[class~="topic/body"] > * > * > *[class~="topic/table"][data-cols='6']),
*[class~="topic/topic"]:has(*[class~="topic/body"] > * > * > *[class~="topic/table"][data-cols='7']),
*[class~="topic/topic"]:has(*[class~="topic/body"] > * > * > *[class~="topic/table"][data-cols='8']),
*[class~="topic/topic"]:has(*[class~="topic/body"] > * > * > *[class~="topic/table"][data-cols='9']),
*[class~="topic/topic"]:has(*[class~="topic/body"] > * > * > *[class~="topic/table"][data-cols='10']) {
  page: landscape-page;
}
How to Fix Text Bleeding From Table Cells
Slim tables or tables that have many columns make the text from the cells be confined to a small horizontal space. Sometimes this causes long words to bleed outside the cell boundaries.
By default, the built-in CSS automatically activates the hyphenation for the text inside tables as long as your topics have the language specified.
overflow-wrap property to force the word to
break:*[class ~= "topic/table"] {
overflow-wrap: break-word;
}How to Fix Small Images in Table
Tables contained in the output of DITA Map PDF - based on HTML5 & CSS (and DITA PDF - based on HTML5 & CSS) transformations have an automatic layout by default. This means that DITA-OT defines a preferred size on them, optimizing their width/height inside the content to make them as small as possible.
If, for example, you have a two-column table without defined column widths and one column contains images while the other column contains text, the table in the generated PDF will have its first column shrunk with smaller images and an enlarged second column (to occupy the least amount of space in the output).
max-width so that the
original size of the image will be used
instead:*[class ~= "topic/image"] {
max-width: unset;
}How to Center Tables
You can center the tables by using margins auto, while the table caption (title) can be centered using the text-align property:
*[class ~= "topic/table"] {
    margin-left:auto;
    margin-right:auto;
    width: 50%;
    border: 1pt solid blue;
}
*[class ~= "topic/table"] *[class ~= "topic/title"]{
    text-align:center;
}
How to Remove the Table NN Label
For the DITA Map PDF - based on HTML5 & CSS transformation scenario, the label
for a table's title is wrapped in a span element with the class:
table--title-label.
<table ... >
...
<caption class="- topic/title title tablecap">
    <span class="table--title-label">Table
        <span class="table--title-label-number">1. </span></span>
    <span class="table--title">The title of the table</span>
</caption>
...
To hide it, set its display to none:
.table--title-label {
    display:none;
}
For the direct transformation, use:
*[class ~= "topic/table"] > *[class ~= "topic/title"]:before {
    content: none;
}
How to Customize Rows, Columns and Cells
Common Use-Cases
background-color CSS property
but any CSS property can be used (border, margin, padding, etc.).- Select all non-header
cells:
*[class ~= "topic/tbody"] *[class ~= "topic/entry"] {
  background-color: lightgray;
}
- Select some table rows (using
:nth-of-type()pseudo-class):/* Select all even rows. */ *[class ~= "topic/tbody"] *[class ~= "topic/row"]:nth-of-type(even) { background-color: lightgray; } /* Select the fourth row. */ *[class ~= "topic/tbody"] *[class ~= "topic/row"]:nth-of-type(4) { background-color: yellow; }
- Select specific table columns (using
:nth-of-type()pseudo-class):/* Select all odd columns. */ *[class ~= "topic/tbody"] *[class ~= "topic/entry"]:nth-of-type(odd) { background-color: lightgray; } /* Select the second column. */ *[class ~= "topic/tbody"] *[class ~= "topic/entry"]:nth-of-type(2) { background-color: yellow; }
Applying Properties to Specific Elements
@outputclass
attribute:<table frame="none"> <title>Flowers</title> <tgroup cols="3"> <colspec colname="c1" colnum="1" colwidth="171pt"/> <colspec colname="c2" colnum="2" colwidth="99pt"/> <colspec colname="c3" colnum="3" colwidth="150pt"/> <thead> <row> <entry>Flower</entry> <entry>Type</entry> <entry>Soil</entry> </row> </thead> <tbody> <row> <entry>Chrysanthemum</entry> <entry outputclass="colored">perennial</entry> <entry>well drained</entry> </row> <row> <entry>Gardenia</entry> <entry>perennial</entry> <entry>acidic</entry> </row> <row outputclass="colored"> <entry>Gerbera</entry> <entry>annual</entry> <entry>sandy, well-drained</entry> </row> </tbody> </tgroup> </table>In this case, the selector will be based on this
outputclass:*[class ~= "topic/table"] *[outputclass ~= "colored"] { background-color: yellow; }
How to Add Stripes to a Table
To create a striped look for your tables, you can use the following CSS rules:
/* Header background and foreground */
*[class ~= "topic/table"][outputclass ~= "stripes"] > *[class ~= "topic/thead"] > *[class ~= "topic/row"]  {
    background-color: blue;
    color:white;
}

/* A default background for the entire table body */
*[class ~= "topic/table"][outputclass ~= "stripes"] > *[class ~= "topic/tbody"] {
    background-color: #eeeeee;
}

/* Color for the stripes */
*[class ~= "topic/table"][outputclass ~= "stripes"] > *[class ~= "topic/tbody"] > *[class ~= "topic/row"]:nth-child(odd) {
    background-color: cyan;
}

/* Border for the cells */
*[class ~= "topic/table"][outputclass ~= "stripes"] *[class ~= "topic/entry"]  {
    border: blue;
}
The above rules assume that tables that are to be painted with stripes are marked with an
@outputclass
attribute:<table outputclass="stripes">...</table>
If you want to make all tables look the same, you can ignore this attribute and remove
the [outputclass ~= "stripes"] simple selector from the above
rules.
How to Display Borders on a Split Cell
*[class ~= "topic/entry"] {
  -oxy-borders-conditionality: retain;
}How to Rotate Content from a Table Cell
In DITA CALS tables, you can rotate the content of a cell by setting the
@rotate attribute to 1.
In the following example, the Sport, All terrain, and
Family header cells are rotated.
<table frame="all" rowsep="1" colsep="1" id="table_d1p_flb_crb">
  <title>Car Features</title>
  <tgroup cols="4">
    <colspec colname="c1" colnum="1" colwidth="14*"/>
    <colspec colname="c2" colnum="2" colwidth="1*" align="center"/>
    <colspec colname="c3" colnum="3" colwidth="1*" align="center"/>
    <colspec colname="c4" colnum="4" colwidth="1*" align="center"/>
    <thead>
      <row>
        <entry morerows="1">Car Name</entry>
        <entry namest="c2" nameend="c4">Features</entry>
      </row>
      <row>
        <entry rotate="1">Sport</entry>
        <entry rotate="1">All terrain</entry>
        <entry rotate="1">Family</entry>
      </row>
    </thead>
    <tbody>
      <row>
        <entry>Tesla Model S</entry>
        <entry>X</entry>
        <entry/>
        <entry>X</entry>
      </row>
...
| Car Name | Features | ||
|---|---|---|---|
| Sport | All terrain | Family | |
| Tesla Model S | X | X | |
The resulting output will be:
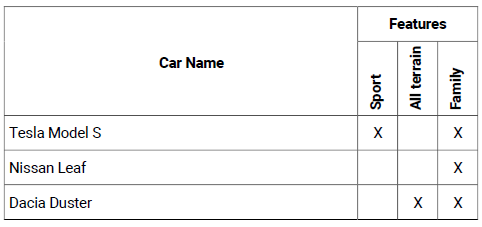
The built-in CSS matches the cells with this attribute and applies the following properties:
*[class~="topic/entry"][rotate='1'] {
  transform: rotate(270deg);

  /* Avoid wrapping, including hyphenation */
  white-space:pre;
  hyphens:manual;

  /* The rotated content will start from the lower side of the cell */
  vertical-align:bottom;
}
To change the vertical alignment of the content (for example, to move it to the middle of the cell), use the following in your CSS customization:
*[class~="topic/entry"][rotate='1'] {
  vertical-align:middle;
}
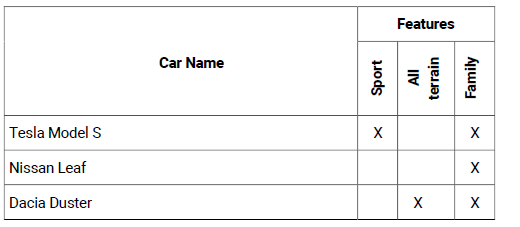
The resulting output will be:

To make the text wrap (for instance, the "All terrain" could be split on two lines), you need to inhibit the whitespace preservation from the built-in CSS. In this case, all spaces will create a line break in the rotated layout. Thus, you can add this in your customization:
*[class~="topic/entry"][rotate='1'] {
  vertical-align:middle;
  white-space:normal;
}
The resulting output will be:
padding-left (for
instance) to move the labels to the horizontal
axis.*[class~="topic/entry"][rotate='1'] { padding-left:2em; }
How to Add Horizontal Lines to a Choice Table
To add horizontal lines that separate the options within a
<choicetable>, you can use borders set on each of the rows. The
following CSS styles the top header and the first column with some background colors. In a
choice table, the first column represents the choice labels.
*[class~="task/choptionhd"],
*[class~="task/choptionhd"],
*[class~="task/chdeschd"],
*[class~="task/choption"] {
	background-color: #EEEEEE;
	text-align: left;
}

*[class~="task/choicetable"] {
	border: 2pt solid #EEEEEE;
}

*[class~="task/choicetable"] *[class~="task/chrow"],
*[class~="task/choicetable"] *[class~="task/chhead"]{
	border-bottom: 2pt solid #EEEEEE;
}

*[class~="task/choicetable"] *[class~="topic/stentry"] {
	border-bottom: none;
	border-right: none;
}