Project Explorer View
By default, the view is positioned on the left side of Oxygen XML Author Eclipse plugin, above the Outline view. If the view has been closed, it can be reopened at any time from the menu (the Project Explorer view is in the Other submenu).
Project View Toolbar
 Collapse
All
Collapse
All- Collapses all project tree folders. You can also collapse/expand a project tree folder if you select it and press the Enter key or Left Arrow to collapse and Right Arrow to expand.
 Link with
Editor
Link with
Editor- When selected, the currently edited file (from the main editor or from the DITA Maps Manager view) is highlighted in the project tree, if the file is found in the project.
- View Menu
- Drop-down menu that contains various settings contributed by the Eclipse plugin.
File Explorer Area
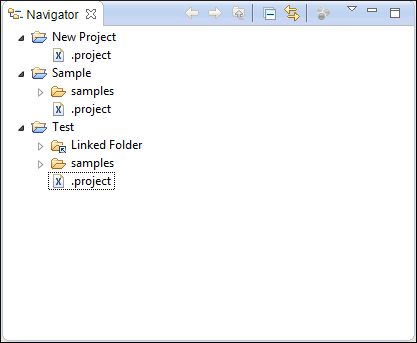
The rest of the view is basically a file explorer similar to most other commonly used file explorers. The XML project (.xpr file) is a logical container with a collection of resources (folders and files). The types of resources displayed include:
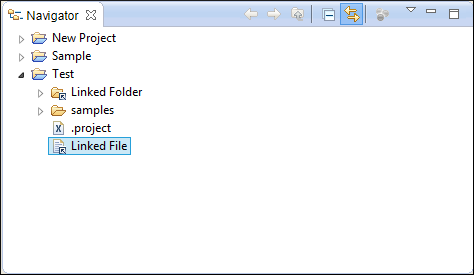
- Logical folders with Linked folders/files - This folder type is used as containers for linked resources
(shortcuts). The icons for file shortcuts include a shortcut symbol (
 ). The linked folders/files are added using or , or by dragging and dropping files/folders from the view or the
system file explorer.
). The linked folders/files are added using or , or by dragging and dropping files/folders from the view or the
system file explorer.  Delete can be used to remove them
from the project.
Delete can be used to remove them
from the project. - Physical folders and files - Marked with the operating
system-specific icon for folders (usually a yellow icon on Windows and a blue icon on
macOS). These folders and files are mirrors of real folders or files that exist in the
local file system. They are created or added to the project by using contextual menu
actions (such as , ,
 Copy, and
 Paste) or by dragging and
dropping files/folders from the view or the system file explorer. Also, the contextual
menu action Delete can be used to
remove them from the project and local file system.
Paste) or by dragging and
dropping files/folders from the view or the system file explorer. Also, the contextual
menu action Delete can be used to
remove them from the project and local file system.
Creating New Projects
- XML Project
- Opens the New XML Project dialog box that allows you to create a new project and adds it to the project structure in the Project Explorer view.
- Sample XML Project
- Opens the New sample XML project dialog box that allows you to customize sample resources in a new project and adds it to the project structure in the Project Explorer view.
Managing Project Contents
There are various contextual menu actions, shortcuts, and ways to organize the folders and files inside the project:
- Creating New Folders and Files
-
- Right-click any item > New >
 File
File - Opens a New Document Wizard that helps you create a new file and adds it to the project structure.
- Right-click any item > New >
 New from
Templates
New from
Templates - Opens a wizard where you can create a new document based on a template and adds it to the project structure.
- Right-click any item > New >
 Folder
 - Opens a New Folder dialog box that allows you to specify a name for a new folder and adds it to the structure of the project.
- Right-click any item > New >
- Adding Resources
-
You can add resources by using drag and drop (or
Copy and
Paste) actions from
within the Project
Explorer view or dragging them from the system file explorer. Files
may have multiple instances within the folder system, but cannot appear twice within
the same folder. - Removing Folders and Files
-
To remove logical folders or the linked resources inside them from the project, use
Delete from
the contextual menu (or press Delete on
your keyboard) and
confirm by clicking OK in the resulting dialog
box.To remove folders or files from both the project and the local file system, use
Delete from the contextual menu (or press
Delete on your keyboard) and
confirm by clicking OK in the resulting dialog
box. - Moving Folders and Files
-
You can move the resources by using drag and drop actions from within the Project Explorer view.
You can also use the usual
Copy and
Paste actions (or the
Move action) from the contextual menu to move resources
in the project.You can also move certain types of files (such as XML) or folders by using the action from the contextual menu. This action opens the Move resource dialog box that includes the following options:- Destination - Presents the path to the current location of the resource you want to move and gives you the option to introduce a new location.
- New name - Presents the current name of the moved resource and gives you the option to change it.
- Update references of the moved
resource(s) - Select this option to update the references to the
resource you are moving, based upon the selected scope. You can select or
configure the scope by using the
 button.
- Renaming Folders and Files
-
There are several ways to rename a folder or file in the project (this works for both physical and linked resources):
- Select Rename from the contextual menu.
- Press F2 on your keyboard.
You also can rename certain types of files (such as XML) or folders by using the action from the contextual menu. This action opens the Rename resource dialog box that includes the following options:- New name - Presents the current name of the edited resource and allows you to modify it.
- Update references of the renamed
resource - Select this option to update the references to the
resource you are renaming. You can select or configure the scope by using the
button.
- Opening Files
- There are several ways to open a file:
- Double-click the file.
- Select it and press Enter on your keyboard.
- Right-click the file and select Open.
- Drag the file from the project tree and drop it in the editor area.
- If you want to choose the application or location where to open it, you can right-click the file and select Open with.
- Saving the Project
- The project file is automatically saved every time the content of the Project Explorer view is saved or modified by actions such as adding or removing files and drag and drop.
Other Contextual Menu Actions
- Refactoring submenu
-
Oxygen XML Author Eclipse plugin includes some refactoring operations that help you manage the structure of your documents. The following actions are available from the contextual menu in the Refactoring submenu:
- Rename resource (Available for certain types of XML documents or folders)
- Opens the Rename resource dialog box where you can change the name of a resource. It also includes an option to update the references to the renamed resource and you can choose between various scopes for the operation.
- Move resource (Available for certain types of XML documents or folders)
- Opens the Move resource dialog box where you can choose a destination and change the name of a resource. It also includes an option to update the references to the moved resource and you can choose between various scopes for the operation.
 XML
Refactoring
XML
Refactoring- Opens the XML Refactoring tool wizard that presents refactoring operations to assist you with managing the structure of your XML documents.
- Show referenced resources
- Opens the Referenced/Dependent Resources view that allows you to see the referenced resource hierarchy for an XML document.
- Show dependent resources
- Opens the Referenced/Dependent Resources view that allows you to see the resource dependencies for an XML document.
- Refresh
- Refreshes the content and the dependencies between the resources in the Main Files directory.
 XPath in
Files
XPath in
Files- Opens the XPath/XQuery Builder view that allows you to compose XPath and XQuery expressions and execute them over the currently edited XML document.
 Check
Spelling in Files
Check
Spelling in Files- Allows you to check the spelling of multiple files.
 Format and
Indent Files
Format and
Indent Files- Opens the Format and Indent Files dialog box that allows you to configure the format and indent (pretty-print) action that will be applied on the selected documents.
- HTML to XML Well-formed (Available when selecting multiple resources)
- Batch converts the selected HTML documents to be XML well-formed. This means that
missing end tags will be added to applicable elements, unclosed tags will be properly
closed, and quotes will be added to attribute values that were missing the
quotes.Notes:
- All selected HTML files are backed up before being processed (same path/name but with the ".bak" extension added at the end).
- Any detected conversion errors are grouped and listed in a dedicated tab in the Results pane at the bottom of the application.
- A brief report is displayed at the end of the operation.
- Transform submenu
-
The currently selected files associated with the Oxygen XML Author Eclipse plugin in the Package Explorer view or Project Explorer view can be transformed in one step with one of the following actions available from contextual menu in the Transform submenu:
 Apply Transformation
Scenario(s)
Apply Transformation
Scenario(s)- Obtains the output with one of the built-in scenarios.
 Configure
Transformation Scenario(s)
Configure
Transformation Scenario(s)- Opens a dialog box that allows you to configure pre-defined transformation scenarios.
- Transform
with
- Allows you to select a transformation scenario to be applied to the currently selected files.
- Validate submenu
-
The currently selected files associated with the Oxygen XML Author Eclipse plugin in the Package Explorer view or Project Explorer view can be checked to be XML well-formed or validated against a schema (DTD, XML Schema, Relax NG, Schematron or NVDL) with one of the following contextual menu actions found in the Validate submenu:
 Check
Well-Formedness
Check
Well-Formedness- Checks if the selected file or files are well-formed.
 Validate
- Validates the selected file or files against their associated schema. For EPUB files, this action triggers an EPUB Validate and Check for Completeness operation.
- Validate with Schema
- Validates the selected file of files against a specified schema.
 Configure
Validation Scenario(s)
Configure
Validation Scenario(s)- Allows you to configure and run a validation scenario.
 Clear Validation
Markers
Clear Validation
Markers- Clears all the error markers from the main editor and Problems view.
 Properties
- Displays the properties of the current file in a Properties dialog box.
- Enable Main Files Support (Available from the project container)
- Allows you to enable the Main Files Support for each project.
 Detect
Main Files (Available from the project container when Main Files Support
is enabled)
Detect
Main Files (Available from the project container when Main Files Support
is enabled)- Opens the Detect Main Files wizard that enables the automatic detection of main files.
 Add to Main
Files (Available when Main Files Support is enabled)
Add to Main
Files (Available when Main Files Support is enabled)- Adds the selected files to the Main Files folder.