Publishing Template Package Contents for WebHelp Responsive Customizations
An Oxygen Publishing Template package for WebHelp output must contain a template descriptor file and at least one CSS file, and may contain other resources (such as graphics, XHTML files, XSLT files, etc.). All the template resources can be stored in either a ZIP archive or in a folder. It is recommended to use a ZIP archive because it is easier to share with others.
Template Descriptor File
Each publishing template includes a descriptor file that defines the meta-data associated with the template. It is an XML file that defines all the resources included in a template (such as CSS files, images, JS files, and transformation parameters).
The template descriptor file must have the .opt file extension and must be located in the template's root folder.
A template descriptor might look like this:
<publishing-template>
    <name>Flowers</name>

    <webhelp>
        <tags>
            <tag>tree</tag>
            <tag>light</tag>
        </tags>
        <preview-image file="flowers-tree.png"/>

        <!-- Resources (CSS, favicon, logo and others) -->
        <resources>
            <!-- Main CSS file -->
            <css file="flowers.css"/>

             <!-- Resources to copy to the output folder -->
            <fileset>
                <include name="resources/**/*"/>
                <exclude name="resources/**/.svn"/>
                <exclude name="resources/**/.git"/>
            </fileset>
        </resources>

        <parameters>
            <parameter name="webhelp.show.main.page.tiles" value="no"/>
            <parameter name="webhelp.show.main.page.toc" value="yes"/>
            <parameter name="webhelp.top.menu.depth" value="3"/>
        </parameters>
    </webhelp>
</publishing-template>
Template Name and Description
Each template descriptor file requires a <name> element. This
information is displayed as the name of the template in the transformation scenario dialog
box.
Optionally, you can include a <description> and it displayed when
the user hovers over the template in the transformation scenario dialog box.
<publishing-template>
    <name>Lorem Ipsum</name>
    <description>Lorem ipsum dolor sit amet, consectetur adipiscing elit</description>
    ...
Template Author
Optionally, you can include author information in the descriptor file and it displayed when the user hovers over the template in the transformation scenario dialog box. This information might be useful if users run into an issue or have questions about a certain template.
If you include the <author> element, a
<name> is required and optionally you can include
<email>, <organization>, and
<organizationUrl> information.
<publishing-template>
    ...
    <author>
      <name>John Doe</name>
      <email>jdoe@example.com</email>
      <organization>ACME</organization>
      <organizationUrl>http://www.example.com/jdoe</organizationUrl>
    </author>
    ...
Webhelp Element
The <webhelp> element contains various details
that define the WebHelp Responsive output. It is a required element if you intend on using
a WebHelp Responsive transformation scenario. The elements that are allowed in this
<webhelp> section specify the template tags, template preview
image, resources (such as
CSS, JS, fonts, logos), transformation parameters, HTML fragment extensions (used to add fragments to placeholders),
XSLT extensions, or HTML page layout files.
    <webhelp>
        <tags>
          ...
        </tags>
        <preview-image file="MyPreview.png"/>

        <resources>
          ...
        </resources>

        <html-page-layouts>
          ...
        </html-page-layouts>

        <parameters>
          ...
        </parameters>
    </webhelp>
Template Tags
The <tags> section provides meta information about the template
(such as layout type or color theme). Each tag is displayed at the top of the
Templates tab window in the transformation scenario dialog box
and they help the user filter and find particular templates.
<publishing-template>
    ...
    <webhelp>
      <tags>
        <tag>tree</tag>
        <tag>dark</tag>
      </tags>
Template Preview Image
The <preview-image> element is used to specify an image that will
be displayed in the transformation scenario dialog box. It provides a visual
representation of the template to help the user select the right template. The image
dimensions should be 200 x 115 pixels and the supported image formats
are: JPEG, PNG, or GIF.
<online-preview-url> element to specify
the URL of a published sample of your template. This will display an  Online preview icon in the bottom-right
corner the image in the transformation scenario dialog box and if the user clicks that
icon, it will open the specified URL in their default
browser.
Online preview icon in the bottom-right
corner the image in the transformation scenario dialog box and if the user clicks that
icon, it will open the specified URL in their default
browser.<publishing-template>
...
<webhelp>
...
<preview-image file="ashes/ashes-tree.png"/>
<online-preview-url>https://www.example.com/samples/tiles/ashes</online-preview-url>Template Resources
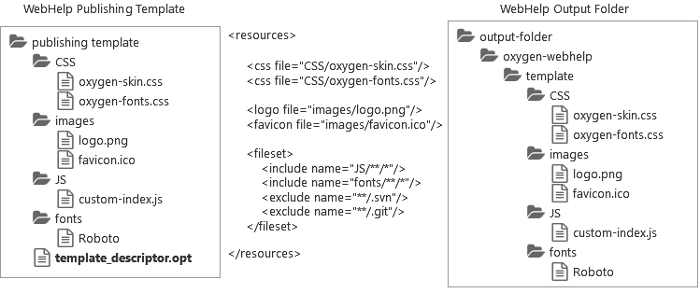
The <resources> section of the descriptor file specifies a set of
resources (CSS, JS, fonts, logos, graphics, etc.) that are used to customize various
components in the generated output. These resources will be copied to the output folder
during the transformation process. At least one CSS file must be included, while the other
types of resources are optional.
@file
attribute must be relative.- CSS files - One or more CSS files that will define the styles of all generated
HTML pages. They are referenced using the
<css>element. - Favicon - You can specify the path to an image for the favicon
associated with your website. It is referenced using the
<favicon>element. - Logo - You can specify the path to a logo image that will be displayed in the
left side of the output header. It is referenced using the
<logo>element. Optionally, you can also specify:<target-url>- will redirect the user to the specified URL if they click the logo in the output.<alt>- provides an alternate text for the logo image.
- Additional Resources (graphics, JS, fonts, folders) - For other resources (such
as images referenced in CSS, JavaScript, fonts, entire folders, etc.) that need to be
included in the output, you need to instruct the transformation to include them in the
output folder. You can specify one or more sets of additional resources to be copied to
the output folder by using the
<fileset>element and you can use one or more<include>and<exclude>elements. This semantic is similar to the ANT FileSet.
<publishing-template>
    ...
    <webhelp>
      ...
      <resources>
          <css file="css/custom_styles.css"/>
          <css file="css/custom_fonts.css"/>

          <favicon file="images/favicon.png"/>

          <logo
           file="images/logo.png"
           target-url="http://www.example.com"
           alt="Alternate text for the logo image"/>

          <js-amd-module file="js/template-main.js"/>

          <fileset>
              <include name="common/**/*"/>
              <include name="JS/**/*"/>
              <exclude name="**/*.svn"/>
              <exclude name="**/*.git"/>
          </fileset>
</resources>The resources specified in the template descriptor are copied to the following output folder: [WebHelp_OUTPUT_DIR]/oxygen-webhelp/template. The following graphic illustrates the mapping between the template resources and the location where they will be copied to the output folder:
Transformation Parameters
<publishing-template>
    ...
    <webhelp>
      ...
      <parameters>
        <parameter
          name="webhelp.show.main.page.toc"
          value="yes"/>
        <parameter
          name="webhelp.top.menu.depth"
          value="3"/>
        <parameter
          name="webhelp.fragment.welcome"
          value="html-fragment/webhelp.fragment.welcome.html"
          type="filePath"/>
      </parameters>
    </webhelp>
The following information can be specified in the <parameter>
element:
- Parameter name
- The name of the parameter. It may be one of the WebHelp Responsive transformation parameters or a DITA-OT HTML-based output parameter.Note: It is not recommended to specify an input/output parameter in the descriptor file (such as the input Map, DITAVAL file, or temporary directory).Attention: JVM arguments like -Xmx cannot be specified as a transformation parameter.
- Parameter Value
- The value of the parameter. It should be a relative path to the template root folder for file paths parameters.
- Parameter Type
- The type of the parameter:
stringorfilepath. Thestringvalue is default.
After creating a publishing template and adding it to the templates gallery, when you select the template in the transformation scenario dialog box, the Parameters tab will automatically be updated to include the parameters defined in the descriptor file. These parameters are displayed in italics.
XSLT Extension Points
<xslt> element in the descriptor file using the following
structure:<publishing-template>
...
<webhelp>
...
<xslt>
<extension
id="com.oxygenxml.webhelp.xsl.dita2webhelp"
file="xsl/customDita2webhelp.xsl"/>
<extension
id="com.oxygenxml.webhelp.xsl.createMainPage"
file="xsl/customMainPage.xsl"/>
</xslt>getParameter(param.name) function
from the http://www.oxygenxml.com/functions namespace.HTML Fragment Placeholders
The HTML pages contain component placeholders that can be used to insert custom HTML fragments either by specifying a well-formed XHTML fragment or referencing a path to a file that contains a well-formed XHTML fragment (for details on how the file or fragment needs to be constructed, see How to Insert Custom HTML Content).
<fragment> element inside the
<html-fragments> section. You can specify one or more HTML fragment
extension points in the descriptor file using the following
structure:<publishing-template>
...
<webhelp>
...
<html-fragments>
<fragment
file="html-fragments/webhelp_fragment_welcome.html"
placeholder="webhelp.fragment.welcome"/>
<fragment
file="html-fragments/webhelp_fragment_footer.html"
placeholder="webhelp.fragment.footer"/>
</html-fragments>Some of these placeholders are left empty in the default output configurations, but you can use them to insert custom content.
Each placeholder has an associated parameter value in the transformation. Some of the placeholder parameters are global and can be used in all type of pages (main page, topic page, search results page, index terms page), while others are applicable for certain type of pages. The following diagram illustrates the predefined placeholders that are global (can be used in any of the types of pages.
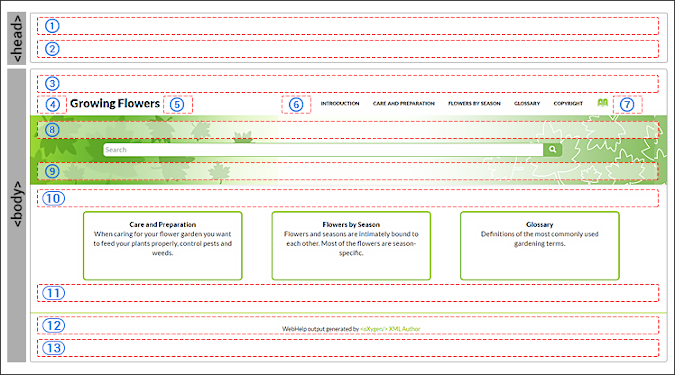
Global Placeholder Parameters
- 1 = webhelp.fragment.head - Displays the specified XHTML fragment in the header section.
- 2 = webhelp.fragment.after.header - Displays the specified XHTML fragment after the header section.
- 3 = webhelp.fragment.before.body - Displays the specified XHTML fragment before the body.
- 4 = webhelp.fragment.before.logo_and_title - Displays the specified XHTML fragment before the logo and title.
- 5 = webhelp.fragment.after.logo_and_title - Displays the specified XHTML fragment after the logo and title.
- 8 = webhelp.fragment.before.search.input - Displays the specified XHTML fragment before the search input component.
- 9 = webhelp.fragment.after.search.input - Displays the specified XHTML fragment after the search input component.
- 10 = webhelp.fragment.before.main.content.area - Displays the specified XHTML fragment before the main content area
- 11 = webhelp.fragment.after.main.content.area - Displays the specified XHTML fragment after the main content area.
- 13 = webhelp.fragment.after.body - Displays the specified XHTML fragment after the body.
Main Page Placeholder Parameters
- webhelp.fragment.head.main.page - Displays the specified XHTML fragment in the header section.
- webhelp.fragment.after.header.main.page - Displays the specified XHTML fragment after the header section.
- webhelp.fragment.before.body.main.page - Displays the specified XHTML fragment before the body.
- webhelp.fragment.before.search.input.main.page - Displays the specified XHTML fragment before the search input component.
- webhelp.fragment.after.search.input.main.page - Displays the specified XHTML fragment after the search input component.
- webhelp.fragment.before.main.content.area.main.page - Displays the specified XHTML fragment before the main content area
- webhelp.fragment.after.main.content.area.main.page - Displays the specified XHTML fragment after the main content area.
- webhelp.fragment.after.body.main.page - Displays the specified XHTML fragment after the body.
- webhelp.fragment.before.toc_or_tiles - Displays the specified XHTML fragment before the main table of contents or tiles component on the main page.
- webhelp.fragment.after.toc_or_tiles - Displays the specified XHTML fragment after the main table of contents or tiles component on the main page.
Topic Page Placeholder Parameters
- webhelp.fragment.head.topic.page - Displays the specified XHTML fragment in the header section.
- webhelp.fragment.after.header.topic.page - Displays the specified XHTML fragment after the header section.
- webhelp.fragment.before.body.topic.page - Displays the specified XHTML fragment before the body.
- webhelp.fragment.before.search.input.topic.page - Displays the specified XHTML fragment before the search input component.
- webhelp.fragment.after.search.input.topic.page - Displays the specified XHTML fragment after the search input component.
- webhelp.fragment.before.main.content.area.topic.page - Displays the specified XHTML fragment before the main content area
- webhelp.fragment.after.main.content.area.topic.page - Displays the specified XHTML fragment after the main content area.
- webhelp.fragment.after.body.topic.page - Displays the specified XHTML fragment after the body.
- webhelp.fragment.before.topic.toolbar - Displays the specified XHTML fragment before the toolbar buttons above the topic content in the topic page.
- webhelp.fragment.after.topic.toolbar - Displays the specified XHTML fragment after the toolbar buttons above the topic content in the topic page.
- webhelp.fragment.before.topic.breadcrumb - Displays the specified XHTML fragment before the breadcrumb component in the topic page.
- webhelp.fragment.after.topic.breadcrumb - Displays the specified XHTML fragment after the breadcrumb component in the topic page.
- webhelp.fragment.before.publication.toc - Displays the specified XHTML fragment before the publication's table of contents component in the topic page.
- webhelp.fragment.after.publication.toc - Displays the specified XHTML fragment after the publication's table of contents component in the topic page.
- webhelp.fragment.before.topic.content - Displays the specified XHTML fragment before the topic's main content in the topic page.
- webhelp.fragment.after.topic.content - Displays the specified XHTML fragment after the topic's main content in the topic page.
- webhelp.fragment.before.feedback - Displays the specified XHTML fragment before the Oxygen Feedback commenting component in the topic page.
- webhelp.fragment.after.feedback - Displays the specified XHTML fragment after the Oxygen Feedback commenting component in the topic page.
- webhelp.fragment.before.topic.toc - Displays the specified XHTML fragment before the topic's table of contents component in the topic page.
- webhelp.fragment.after.topic.toc - Displays the specified XHTML fragment after the topic's table of contents component in the topic page.
Search Results Page Placeholder Parameters
- webhelp.fragment.head.search.page - Displays the specified XHTML fragment in the header section.
- webhelp.fragment.after.header.search.page - Displays the specified XHTML fragment after the header section.
- webhelp.fragment.before.body.search.page - Displays the specified XHTML fragment before the body.
- webhelp.fragment.before.search.input.search.page - Displays the specified XHTML fragment before the search input component.
- webhelp.fragment.after.search.input.search.page - Displays the specified XHTML fragment after the search input component.
- webhelp.fragment.before.main.content.area.search.page - Displays the specified XHTML fragment before the main content area
- webhelp.fragment.after.main.content.area.search.page - Displays the specified XHTML fragment after the main content area.
- webhelp.fragment.after.body.search.page - Displays the specified XHTML fragment after the body.
- webhelp.google.search.script - Replaces the search input component with a Google search component.
Index Terms Page Placeholder Parameters
- webhelp.fragment.head.terms.page - Displays the specified XHTML fragment in the header section.
- webhelp.fragment.after.header.terms.page - Displays the specified XHTML fragment after the header section.
- webhelp.fragment.before.body.terms.page - Displays the specified XHTML fragment before the body.
- webhelp.fragment.before.search.input.terms.page - Displays the specified XHTML fragment before the search input component.
- webhelp.fragment.after.search.input.terms.page - Displays the specified XHTML fragment after the search input component.
- webhelp.fragment.before.main.content.area.terms.page - Displays the specified XHTML fragment before the main content area
- webhelp.fragment.after.main.content.area.terms.page - Displays the specified XHTML fragment after the main content area.
- webhelp.fragment.after.body.terms.page - Displays the specified XHTML fragment after the body.
Using String Values in Placeholder Parameter Values
If you use strings for values of HTML fragment placeholder parameter values, the string values are written to files in the transformation's temporary directory. The values of the associated parameters reference the paths of the temporary files. This means that the HTML fragments will have a uniform processing in the WebHelp's XSLT Module.
Example:
# String value
webhelp.fragment.welcome = <p>This is an HTML paragraph.</p>
A new file that contains the parameter's value is created:
<p>This is an HTML paragraph.</p>
# Absolute file path as value
webhelp.fragment.welcome= [temp-dir]/whr-html-fragments/webhelp_fragment_welcome.xml
WebHelp Responsive Macros
You can use the whc:macro layout component to specify a macro value (a
variable that will be expanded when the output files are generated).
${macro-name}or${macro-name(macro-parameter)}A macro name can accept any alphanumeric characters, as well as the following characters:
- (minus), _ (underscore), . (dot),
: (colon). The value of a parameter may contain any character except the
} (close curly bracket) character.
Implementations
- i18n
- For localizing a
string.
${i18n(string.id)} - param
- Returns the value of a transformation
parameter.
${param(webhelp.show.main.page.tiles)} - env
- Returns the value of an environment
variable.
${env(JAVA_HOME)} - system-property
- Returns the value of a system
property.
${system-property(os.name)} - timestamp
- Can be used to format the current date and time. Accepts a string (as a parameter)
that determines how the date and time will be formatted (format string or
picture string as it is known in the XSLT specification). The format
string must comply with the rules of the XSLT
format-dateTimefunction specification.${timestamp([h1]:[m01] [P] [M01]/[D01]/[Y0001])} - path
- Returns the path associated with the specified path ID. The following paths IDs are
supported:
- oxygen-webhelp-output-dir - The path to the output directory. The path is relative to the current HTML file.
- oxygen-webhelp-assets-dir - The path to the oxygen-webhelp subdirectory from the output directory. The path is relative to the current HTML file.
- oxygen-webhelp-template-dir - The path to the template directory. The
path is relative to the current HTML
file.
${path(oxygen-webhelp-template-dir)}
Note: New paths IDs can be added by overriding thewh-macro-custom-pathtemplate from com.oxygenxml.webhelp.responsive\xsl\template\macroExpander.xsl:<!-- Extension template for expanding a custom path macro. --> <xsl:template name="wh-macro-custom-path"> <xsl:param name="pathId"/> <xsl:value-of select="$pathId"/> </xsl:template>
- map-xpath
- Can be used to execute an XPath expression over the DITA map file from the temporary
directory. Tip: Available in all template layout HTML pages.
${map-xpath(/map/title)} - topic-xpath
- Can be used to execute an XPath expression over the current topic. Tip: Available only in the topic HTML page template (wt_topic.html).
${topic-xpath(string-join(//shortdesc//text(), ' '))} - oxygen-webhelp-build-number
- Returns the current WebHelp distribution ID (build
number).
${oxygen-webhelp-build-number}
Extensibility
wh-macro-extension template from the
com.oxygenxml.webhelp.responsive\xsl\template\macroExpander.xsl
file.<!-- Extension template for expanding custom macro constructs --> <xsl:template name="wh-macro-extension"> <xsl:param name="name"/> <xsl:param name="params"/> <xsl:param name="contextNode"/> <xsl:param name="matchedString"/> <xsl:choose> <xsl:when test="$contextNode instance of attribute()"> <xsl:value-of select="$matchedString"/> </xsl:when> <xsl:otherwise> <xsl:message>Cannot expand macro: [<xsl:value-of select="$matchedString"/>]</xsl:message> <xsl:copy-of select="$contextNode"/> </xsl:otherwise> </xsl:choose> </xsl:template>
wh-macro-extension template has the following parameters:- name - The name of the current macro.
- params - List of parameters of the current macro as a
stringsequence. The current macros parsing mechanism only allows macros with a maximum of one parameter. Consequently, this list will contain at most one element. - contextNode - The current element or attribute where the macro was declared.
- matchedString - The entire value of the matched macro as specified in the HTML template page.
Combining WebHelp Responsive and PDF Customizations in a Template Package
<webhelp> and
<pdf> element and some of the resources can be reused. Resources
referenced in elements in the <webhelp> element will only be used for
WebHelp transformations, and resources referenced in the elements in the
<pdf> element will only be used in PDF
transformations.<publishing-template>
<name>Flowers</name>
<description>Flowers themed light-colored template</description>
<webhelp>
<tags>
<tag>purple</tag>
<tag>light</tag>
</tags>
<preview-image file="flowers-preview.png"/>
<resources>
<css file="flowers-wh.css"/>
<css file="flowers-page-styling.css"/>
</resources>
<parameters>
<parameter name="webhelp.show.main.page.tiles" value="no"/>
<parameter name="webhelp.show.main.page.toc" value="yes"/>
</parameters>
</webhelp>
<pdf>
<tags>
<tag>purple</tag>
<tag>light</tag>
</tags>
<preview-image file="flowers-preview.png"/>
<resources>
<css file="flowers-pdf.css"/>
<css file="flowers-page-styling.css"/>
</resources>
<parameters>
<parameter name="show.changes.and.comments" value="yes"/>"/>
</parameters>
<pdf>
</publishing-template>