Inserting an Olink in DocBook Documents
The <olink> element is used for linking to resources outside the current
DocBook document. The @targetdoc attribute is used for the document ID that
contains the target element and the @targetptr attribute for the ID of the
target element (the value of an @id or @xml:id attribute).
The combination of those two attributes provides a unique identifier to locate cross
references.
For example, a Mail Administrator Guide with the document ID
MailAdminGuide might contain a chapter about user accounts, like
this:
<chapter id="user_accounts">
<title>Administering User Accounts</title>
<para>blah blah</para>
You can form a cross reference to that chapter by adding an <olink>, as in
the following example:
You may need to update your
<olink targetdoc="MailAdminGuide" targetptr="user_accounts">user accounts
</olink>
when you get a new machine.
To use an <olink> to create links between documents, follow these steps:
-
Insert
<olink>elements in the DocBook documents.When editing a DocBook XML document in Author mode, the Insert OLink action is available in the Link drop-down menu from
the toolbar. This action opens the Insert OLink dialog box that
allows you to select the target of an
Link drop-down menu from
the toolbar. This action opens the Insert OLink dialog box that
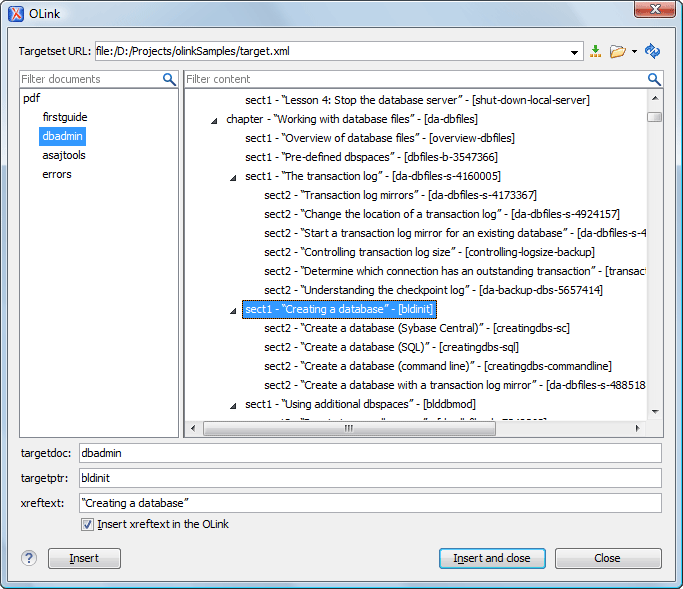
allows you to select the target of an <olink>from the list of all possible targets from a specified target database document (specified in the Targetset URL field). Once a Targetset URL is selected, the structure of the target documents is presented. For each target document (@targetdoc), its content is displayed, allowing you to easily identify the appropriate@targetptr. You can also use the search fields to quickly identify a target. If you already know the values for the@targetdocand@targetptrattributes, you can insert them directly in the corresponding fields.Example: In the following image, the target database document is called target.xml, dbadmin is selected for the target document (
@targetdoc), and bldinit is selected as the value for the@targetptrattribute. Notice that you can also add XREF text into the<olink>by using the xreftext field.Figure 1. Insert OLink Dialog Box