XSLT Refactoring Actions
Oxygen XML Editor offers a set of actions that allow you to change the structure of an XSLT stylesheet without changing the results of running it in an XSLT transformation. Depending on the selected text, the following XSLT refactoring actions are available from the Refactoring submenu of the contextual menu (or from the menu):
 Extract
template (Active only when the selection contains well-formed
elements)
Extract
template (Active only when the selection contains well-formed
elements)- Extracts the selected XSLT instructions sequence into a
new template. It opens a
dialog box that allows you to specify the name of the new template to be created. The
possible changes to perform on the document can be previewed before altering the
document. After pressing OK, the template is created and the selection is replaced with
the
<xsl:call-template>instruction referencing the newly created template.Note:The newly created template is indented and its name is highlighted in the<xsl:call-template>element.  Extract
function
Extract
function- Extracts the selected XSLT instructions sequence into a new function. It opens a dialog box that allows you to specify the name of the new function. It then moves the selected lines to a newly created XSLT function and inserts a function call in the place of the selected lines. XPath expressions are rebuilt based on the current context and the context is passed as parameters in the new functions. You can also use parts of an XPath expression to create the new functions.
 Create local
variable
Create local
variable- Creates an XSLT variable, wrapped around the selection. It opens a dialog box that allows you to specify the name of the new variable. It then wraps the selection in the variable and you can reference it at anytime in the code.
 Move to
another stylesheet (Active only when entire components are selected)
Move to
another stylesheet (Active only when entire components are selected)- Allows you to move one or more XSLT global
components (templates, functions, or parameters) to another stylesheet. It
opens a dialog box that allows you to specify where the selected components will be
moved to. Follow these steps when using the dialog box:
- Choose whether you want to move the selected components to a new stylesheet or an existing one.
- If you choose to move the components to an existing one, select the destination
stylesheet. Click the Choose button to select the destination
stylesheet file. Oxygen XML Editor will automatically check if the destination
stylesheet is already contained by the hierarchy of the current stylesheet. If it is
not contained, choose whether or not the destination stylesheet will be referenced
(imported or included) from the current stylesheet. The following options are
available:
- Include - The current stylesheet will use an
<xsl:include>instruction to reference the destination stylesheet. - Import - The current stylesheet will use an
<xsl:import>instruction to reference the destination stylesheet. - None - There will be created no relation between the current and destination stylesheets.
- Include - The current stylesheet will use an
- Click the Move button to move the components to the destination. The moved components are highlighted in the destination stylesheet.
- Convert attributes to xsl:attributes
-
Converts the attributes from the selected element and represents each of them with an
<xsl:attribute>instruction. For example, the following element:<person id="Big{test}Boss"/>is converted to:<person> <xsl:attribute name="id"> <xsl:text>Big</xsl:text> <xsl:value-of select="test"/> <xsl:text>Boss</xsl:text> </xsl:attribute> </person> - Convert xsl:attributes to attributes
-
Converts
<xsl:attribute>elements to inline attributes for elements outside the XSL namespace. For example, the following element: It is the reverse of the Convert attributes to xsl:attributes action with the following limitations:- The
<xsl:attribute>element is "text only". - The
<xsl:attribute>element has a single<xsl:text>child element. - The
<xsl:attribute>element has a single<xsl:value-of>child element. In this case, the value of the attribute will be the XPath expression from the@selectattribute surrounded by curly brackets (text value template).
<person>
  <xsl:attribute name="id">john.doe</xsl:attribute>
  <xsl:attribute name="email"><xsl:text>john.doe@example.com</xsl:text>
  </xsl:attribute>
  <xsl:attribute name="manager"><xsl:value-of select="person[@id='boss']/name"/>
  </xsl:attribute>
</person>
is converted to:<person id="john.doe" email="john.doe@example.com" manager="{person[@id='boss']/name}"/> - The
- Convert xsl:if into xsl:choose/xsl:when
-
Converts one or more
<xsl:if>element blocks into one or more<xsl:when>blocks surrounded by an<xsl:choose>element. If it is invoked on a selection, the selection must contain a well-formed fragment. If there is no selection, the<xsl:if>element that surrounds the content at the current cursor position is converted.For example, the following block:<xsl:if test="a"> <!-- XSLT code --> </xsl:if>is converted to:<xsl:choose> <xsl:when test="a"> <!-- XSLT code --> </xsl:when> <xsl:otherwise> | </xsl:otherwise> </xsl:choose>where the
|character is the current cursor position. - Convert xsl:choose/xsl:when into xsl:if
-
Converts each
<xsl:when>block into an<xsl:if>block. For the<xsl:otherwise>branch, it also adds an and statement to each negated form of the conditions. For example, the following block:<xsl:choose> <xsl:when test="c1"> <!-- XSLT statement 1 --> </xsl:when> <xsl:when test="c2"> <!-- XSLT statement 2 --> </xsl:when> <xsl:when test="c3"> <!-- XSLT statement 3 --> </xsl:when> <xsl:otherwise> <!-- XSLT "otherwise" statement--> </xsl:otherwise> </xsl:choose>is converted to:<xsl:if test="c1"> <!-- XSLT statement 1 --> </xsl:if> <xsl:if test="c2"> <!-- XSLT statement 2 --> </xsl:if> <xsl:if test="c3"> <!-- XSLT statement 3 --> </xsl:if> <xsl:if test="not(c1) and not(c2) and not(c3)"> <!-- XSLT "otherwise" statement--> </xsl:if>  Extract local
variable (Active on a selection made inside an attribute that contains an
XPath expression)
Extract local
variable (Active on a selection made inside an attribute that contains an
XPath expression)- Allows you to create a new local variable by extracting the selected XPath expression. After creating the new local variable before the current element, Oxygen XML Editor allows you to edit the name of the variable.
 Extract global variable
(Active on a selection made inside an attribute that contains an XPath expression)
Extract global variable
(Active on a selection made inside an attribute that contains an XPath expression)- Allows you to create a new global variable by extracting
the selected XPath expression. After
creating the new global variable, Oxygen XML Editor allows you to edit the name of
the variable.Note:Oxygen XML Editor checks if the selected expression depends on local variables or parameters that are not available in the global context where the new variable is created.
 Extract template
parameter (Active on a selection made inside an attribute that contains an
XPath expression)
Extract template
parameter (Active on a selection made inside an attribute that contains an
XPath expression)- Allows you to create a new template parameter by extracting the selected XPath expression. After creating the new parameter, Oxygen XML Editor allows you to edit the name of the parameter.
 Extract global parameter
(Active on a selection made inside an attribute that contains an XPath expression)
Extract global parameter
(Active on a selection made inside an attribute that contains an XPath expression)- Allows you to create a new global parameter by
extracting the selected XPath expression. After
creating the new parameter, Oxygen XML Editor allows you to edit the name of the
parameter.Note:Oxygen XML Editor checks if the selected expression depends on local variables or parameters that are not available in the global context where the new parameter is created.
- Rename Component
- Allows you to rename the current component (in-place). The component and all its references in the document are highlighted with a thin border and the changes you make to the component at the cursor position are updated in real time to all occurrences of the component. To exit the in-place editing, press the Esc or Enter key on your keyboard.
 Rename Component in
-
Opens a dialog box that allows you to rename the selected component by specifying the new component name and the files to be affected by the modification. If you click the Preview button, you can view the files to be affected by the action.
Figure 1. Rename Identity Constraint Dialog Box 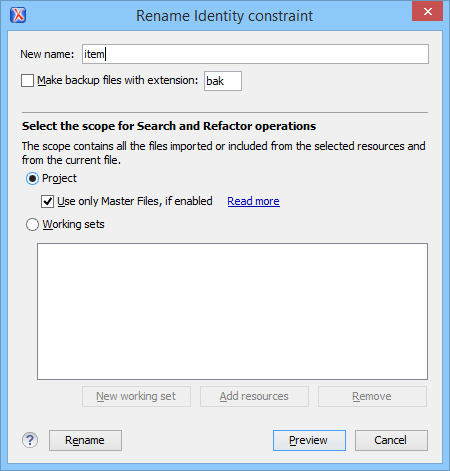
Resources
For more information about XSLT refactoring, watch our video demonstration: